

Quick answer: An Automation License Manager is a system that creates, delivers, limits and renews software license keys without you touching each order. On WooCommerce you get this with License Manager for WooCommerce Pro: a generator creates a unique key when an order is paid, WooCommerce emails it to the buyer, activation limits are enforced by the API, the update server checks the key automatically, and buyers manage everything in My Account.
If you still copy keys from a spreadsheet into emails, reset activations by hand, or chase expired customers one by one, this guide shows how to automate the whole license workflow from start to end in 10 steps. Each step says where to click, what to set and what you should see.
Want to see the automation screens first? You can open the live demo and click through Generators, Licenses and Activations.
What an Automation License Manager automates
| Manual task | What happens automatically |
|---|---|
| Creating a key for each sale | A generator creates a unique key the moment the order is paid |
| Emailing the key | The key is added to the order email and the order page |
| Limiting sites or devices | The activation API refuses activations above the limit |
| Checking who may update | The update server only serves new versions to valid, unexpired keys |
| Moving a license to a new site | The buyer deactivates and reactivates from My Account |
| Renewals | Subscriptions renew the order and extend the key expiry |
What you need before you start
- A WordPress site with WooCommerce and a working payment method.
- License Manager for WooCommerce Pro installed on that store.
- The product you sell: a plugin, theme, desktop app, game or course access.
- Optional: WooCommerce Subscriptions for automatic annual renewals.
- A test site or test account to check every step before going live.
Step 1: Install License Manager and switch on automation settings
- Go to Plugins > Add New > Upload Plugin, upload the License Manager Pro ZIP and click Activate.
- Open License Manager > Settings.
- Turn on the options to show license keys in My Account and in order emails, and to let customers activate and deactivate their own keys.
- Click Save changes.
Expected result: a new License Manager menu with Licenses, Generators, Activations and Settings, and customer self-service turned on.
Step 2: Create a generator so keys are made automatically
- Go to License Manager > Generators > Add new.
- Name it after the plan, for example
Pro - 1 site - 1 year. - Set the character map (for example
ABCDEFGHJKLMNPQRSTUVWXYZ23456789), chunks (4), chunk length (5) and an optional prefix such asPRO-. - Set Maximum activation count (1 for a single site) and Expires in (365 days for annual, empty for lifetime).
- Click Save. Repeat for each plan, such as 5 sites or 25 sites.
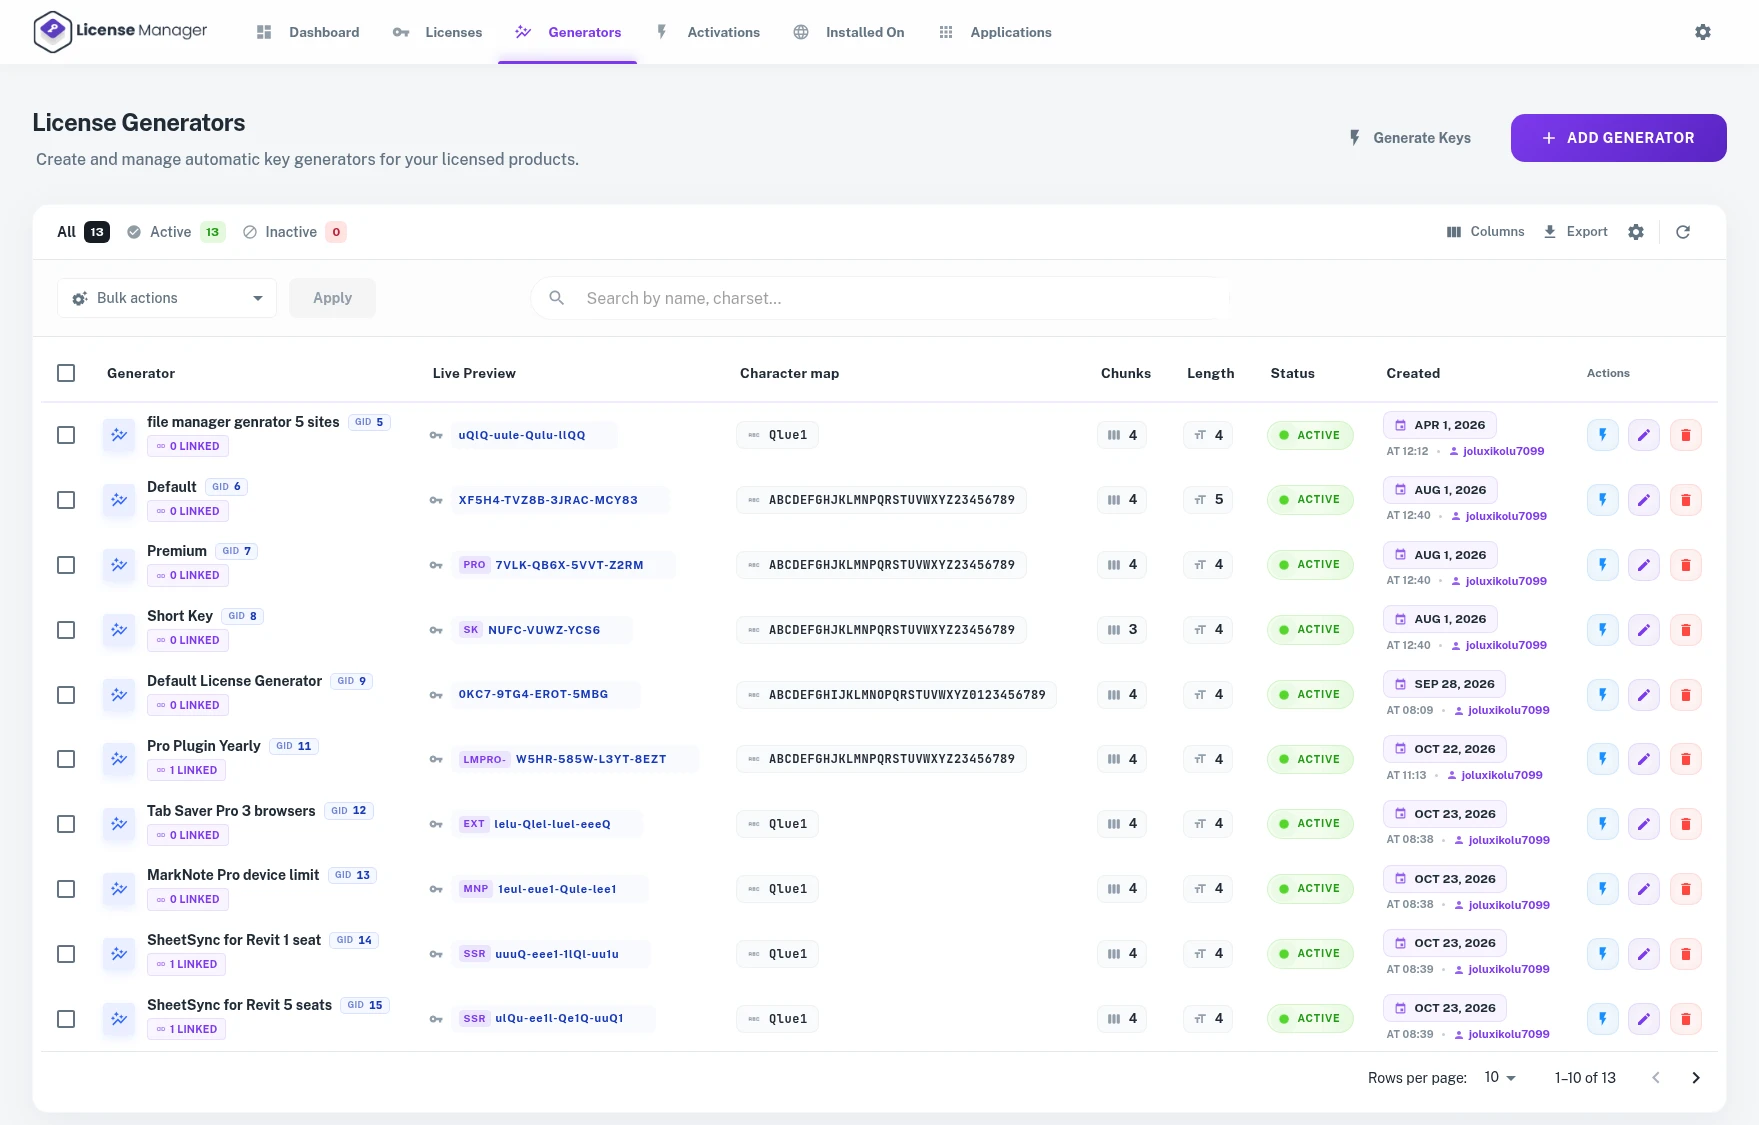
Expected result: a list of generators, one per plan, ready to create keys on demand.
Why it matters for automation: you never type or copy a key again. Every paid order gets a fresh, unique key with the right limit.
Step 3: Connect the generator to your WooCommerce product
- Go to Products > Add New (or edit your existing product). Tick Virtual and Downloadable.
- For several plans, choose Variable product and add a variation per plan (1 site, 5 sites, 25 sites).
- Open the License Manager tab (or the variation settings) and tick Sell license keys.
- Choose Generate license keys and select the matching generator. Set Delivered quantity to 1.
- Click Update.
Expected result: each product or variation is linked to a generator, so the key is created automatically at checkout.
Step 4: Let paid orders deliver keys automatically
- Keys are issued when the order reaches Completed. For virtual and downloadable products WooCommerce usually completes paid orders on its own.
- If your gateway leaves orders in Processing, check the product is marked Virtual and Downloadable so completion is automatic.
- Check WooCommerce > Settings > Emails > Completed order is enabled (WooCommerce email docs). License Manager adds the key to this email.
- Place a test order with a test payment method.
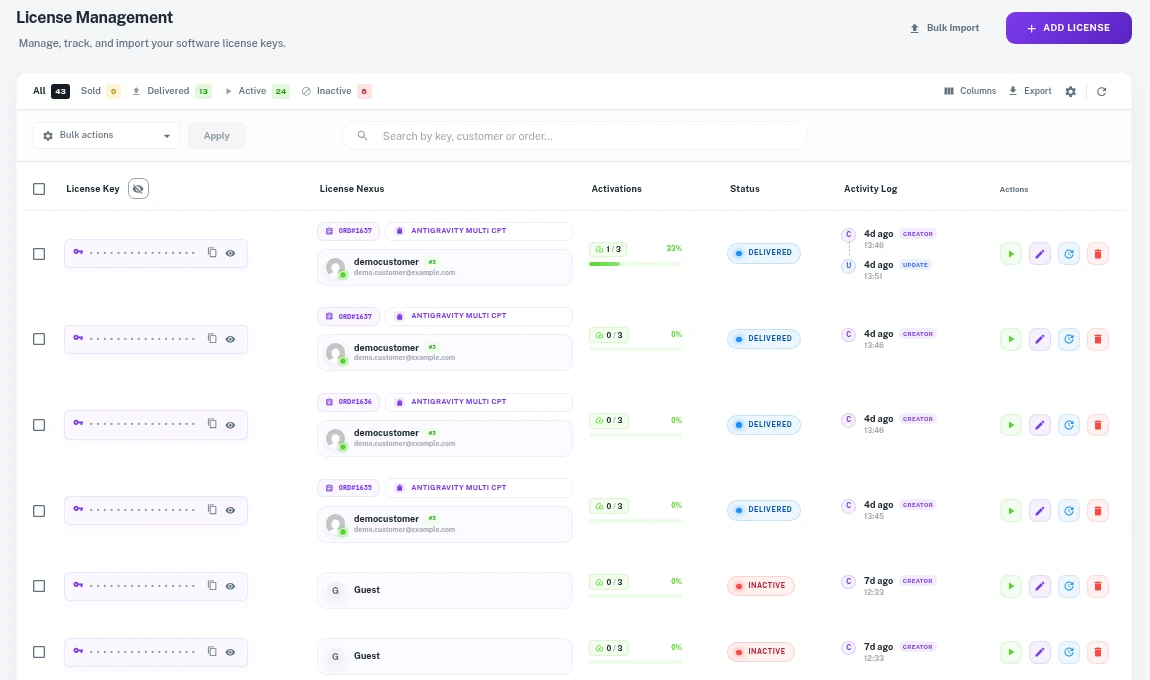
Expected result: the buyer receives the key in the order email and on the order page, and the key appears under License Manager > Licenses with its order number.
Why it matters for automation: delivery happens at 3 a.m. on a Sunday exactly like at noon. No support ticket saying “where is my key?”.
Step 5: Import existing keys (only if you already have customers)
- Export your old keys to CSV with the columns key, order or customer, expiry and activation limit.
- Go to License Manager > Licenses > Import and upload the file.
- Check a few imported keys open with the correct customer and expiry.
Expected result: old and new customers live in one automated system.
Step 6: Automate activation limits in your software
Your plugin, app or game calls the License Manager REST API when the buyer enters a key. The API checks the key and the limit for you.
- Go to License Manager > Settings > REST API keys and create a read/write key pair for your software.
- In your software, on “Activate”, send the license key and a label (domain or device name) to the activate route.
- Store the returned activation token locally and check the key on a schedule (for example once a day) with the validate route.
- On “Deactivate”, call the deactivate route so the seat is freed.
GET https://yourstore.com/wp-json/lmfwc/v2/licenses/activate/PRO-XXXXX-XXXXX-XXXXX-XXXXX?label=client-site.com
GET https://yourstore.com/wp-json/lmfwc/v2/licenses/validate/PRO-XXXXX-XXXXX-XXXXX-XXXXX
GET https://yourstore.com/wp-json/lmfwc/v2/licenses/deactivate/PRO-XXXXX-XXXXX-XXXXX-XXXXX?token=ACTIVATION_TOKEN
Expected result: a second activation on a 1-site key is refused automatically, and each activation shows up under License Manager > Activations.
Step 7: Automate updates for licensed buyers
- Go to License Manager > Applications > Add new and register your product.
- Upload each new version as a Release with a version number and changelog.
- In your software, run the update check with the application key and the buyer’s license key.
- License Manager answers with the new version and download link only for active, unexpired keys.
Applications, releases and the update server are part of Pro. Compare License Manager Pro plans.
Expected result: buyers with a valid key see “Update available” in their dashboard; expired keys do not get the download.
Step 8: Turn on self-service in My Account
- Make sure My Account license settings from Step 1 are on.
- Log in as a test customer and open My Account > License keys.
- Check the customer can see each key, its expiry, activations, download the latest file and deactivate an old site.
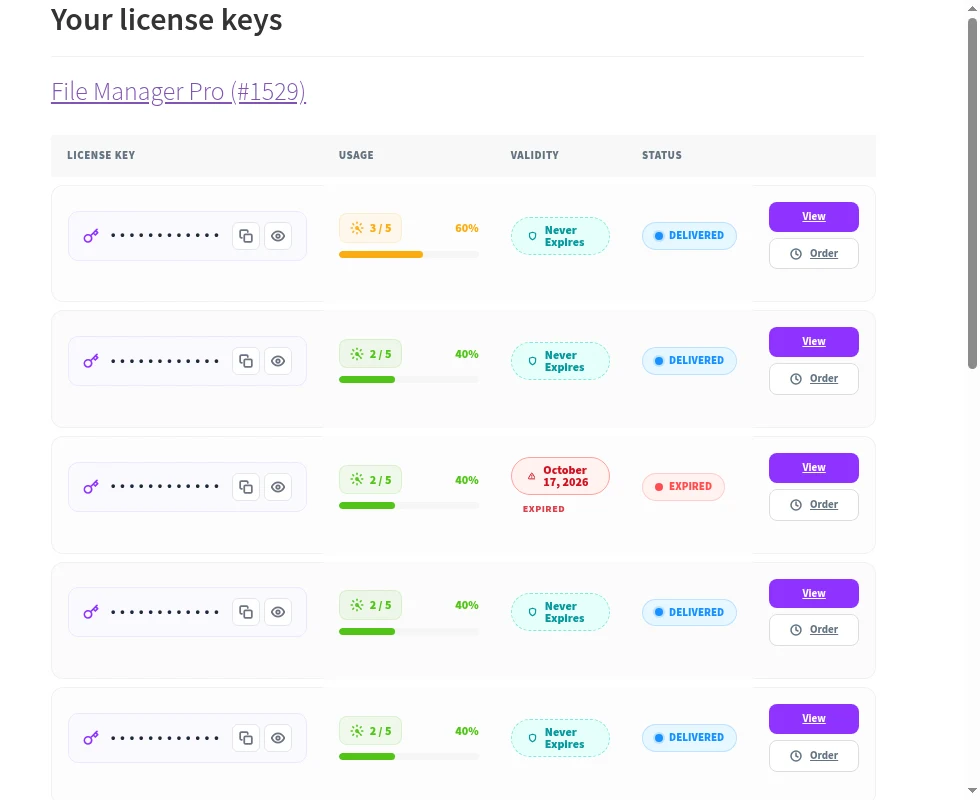
Expected result: moving a license to a new site or computer needs no email to you.
Step 9: Automate renewals and expiry
- Install WooCommerce Subscriptions and make the product a yearly subscription.
- In License Manager settings, enable extending the key expiry on renewal, so the same key keeps working.
- When a renewal payment succeeds, the expiry moves forward automatically. If it fails, the key expires on its date and updates stop.
Expected result: renewal revenue comes in without manual invoices, and buyers keep one key for years.
Step 10: Test the full automation before going live
- Buy each plan once with a test payment.
- Confirm the key arrives in the email and appears in Licenses.
- Activate on one site, then try a second site on a 1-site key and confirm it is refused.
- Deactivate in My Account and reactivate on the new site.
- Publish a new release and confirm the test site sees the update.
- Set a test key’s expiry to yesterday and confirm the update is refused.
- Run a test renewal and confirm the expiry moves forward.
Expected result: every part of the license lifecycle runs on its own. Your Automation License Manager is live and you only look at reports.
Common automation mistakes to avoid
- Linking the wrong generator to a variation, so a 25-site plan gets a 1-site key.
- Orders stuck in Processing, so keys are not sent. Mark products Virtual and Downloadable.
- Never calling deactivate in your software, so buyers run out of seats.
- Leaving the REST API key in public code. Keep write keys on your server side.
Frequently asked questions
Put your license workflow on autopilot
Automatic keys, delivery, activation limits, update checks and renewals, all inside WooCommerce.